Convert Film Camera to Digital
Fit Sony Nex digital Exmor Sensor to 35mm Film Camera
Remove Filters & Prepare CMOS Sensor for Inserting to any 35mm Film Camera
Links for more details : Xovercameras Blog Nikon FE Digital on Youtube How to do this conversion on YouTube
This is the start of a series of pages to assist owners of collectable film cameras with the knowledge to be able to to fit a Sony Nex 14 or 16 mp CMOS Sensor into the film rectangle area, at near to exact, the crucial Film Plane depth. The inserted sensor should still be clear of the shutter enabling your film camera to take perfectly in-focus digital photos by fitting a Sony Nex to the rear of the film camera as the “Electric Film”.
I have tested the clearance on the following cameras so am fairly confident that it will apply to all 35mm Film Cameras. Tested – Leica M3, Leicaflex SL2, Canon A1, Nikon FE, Nikon FE2.
With a digital sensor it is hard to ascertain just where the Film Plane location is. On my tests and trials with the “Electric Film” conversion of a Nikon FE (see my blog and youtube video), I was able to accurately rebate a Sony Nex Exmor Sensor into the film plane and achieve perfect focus at F1.8 over varying distances, including infinity. This involved sanding the rebate and retesting the sensor with pictures until the perfect focus was obtained. It also involved relocating the sensor infra red and AA filter combination to the inside of the film camera up against the camera shutter behind the mirror (Youtube Nikon FE Digital).
The following pictorial shows the process to follow with the adjustments to the CMOS Sensor to fit it into the Film Plane. To dismantle the Sony Nex just Google your model and there are various websites that will show the process.
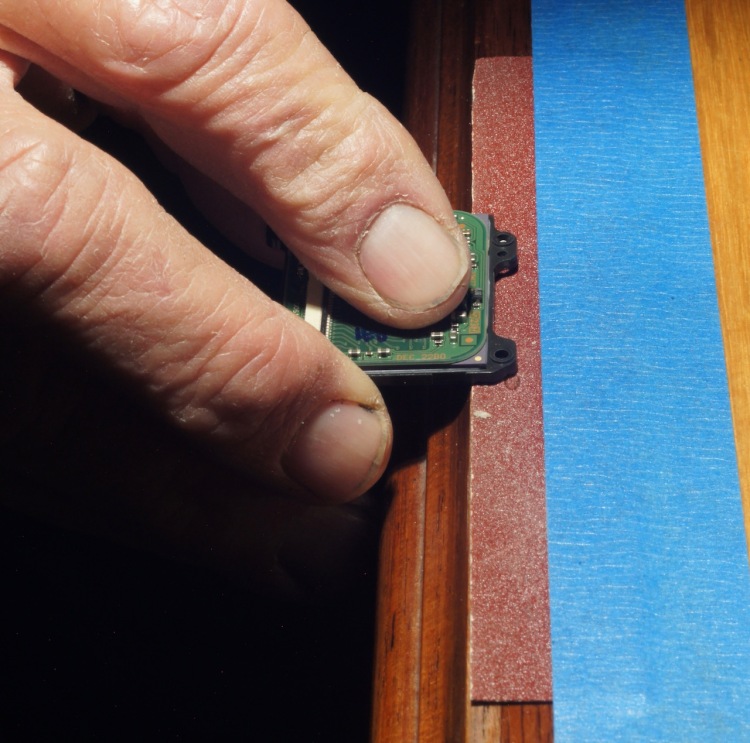
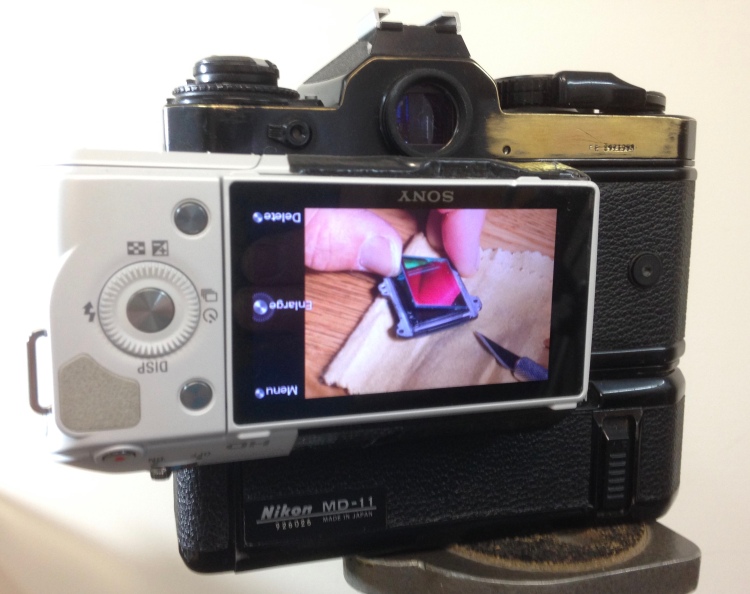
This is my 1980 model Nikon FE film camera fitted with a Sony Nex 3 “Electric Film” back used to take all the photos in this pictorial.
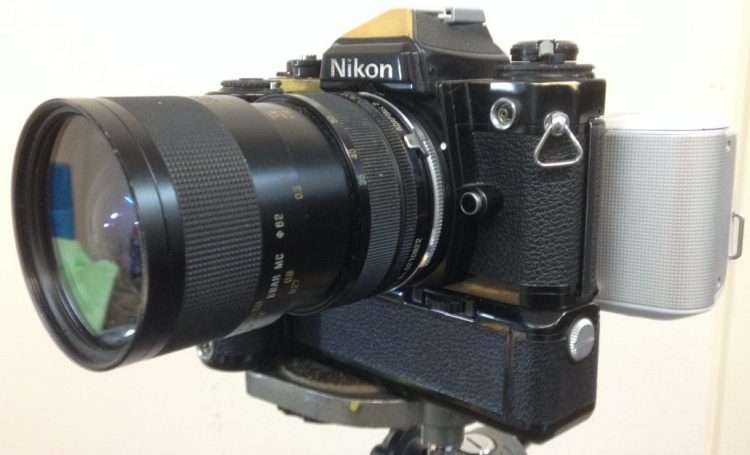
Nikon FE with Sony Nex 3 Electric Film back.
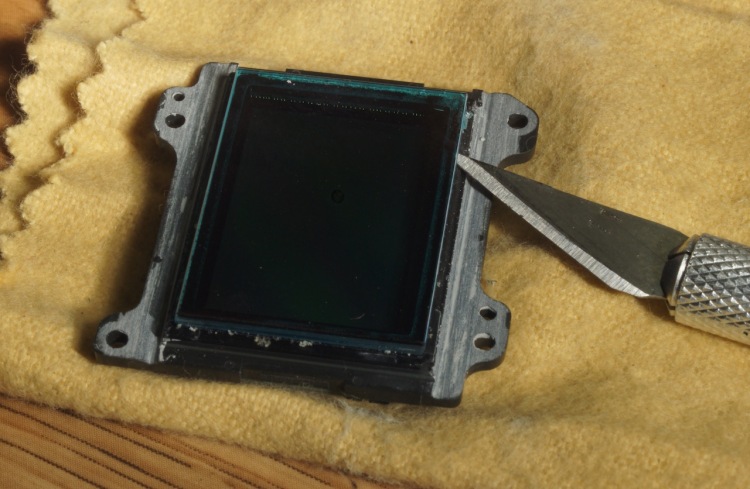
Upon removing the Sensor from the Sony Nex the first job is to reduce the width of the underlying glass over the actual sensor. You will see this as a clear glass below the Infra Red filter combo that has a width of approx 24.6mm. This needs to be less than the film rectangle vertical width in your film camera (which is approx 23.90mm) so the sensor can drop into this rectangle and be at the critical Film Plane. I found that an easily accessible tool for this is a diamond encrusted knife sharpener that has a fairly sharp edge or even a small grind stone that you might use for sharpening fish hooks or pocket knives. Using this with a firm but gentle action resulted in the sanding back of this glass to a width of approx 23.75mm in about 20 minutes.
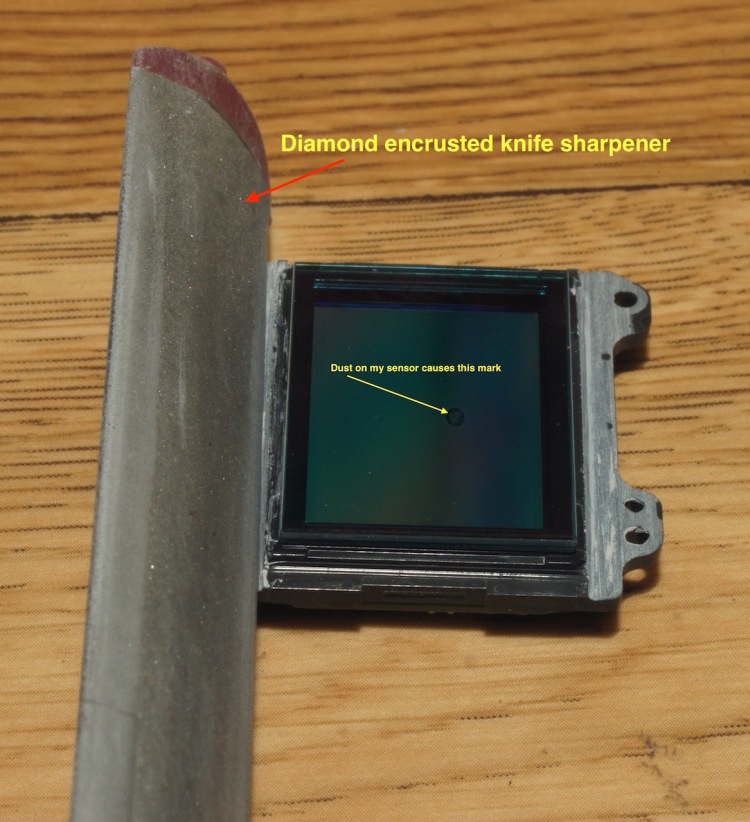
Using a diamond encrusted knife sharpener to sand back the underlying
sensor protection glass. Note the small speck of dust on my own
Nikon FE sensor that plagued all my photos.
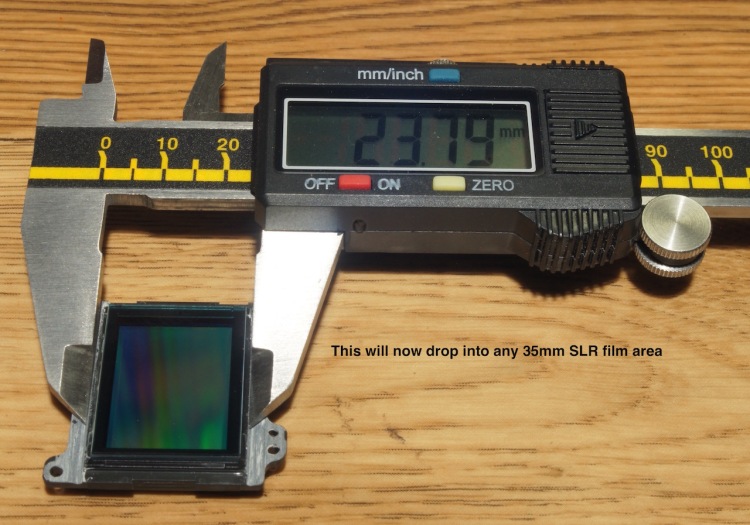
Sensor protection glass adjusted to a suitable width.
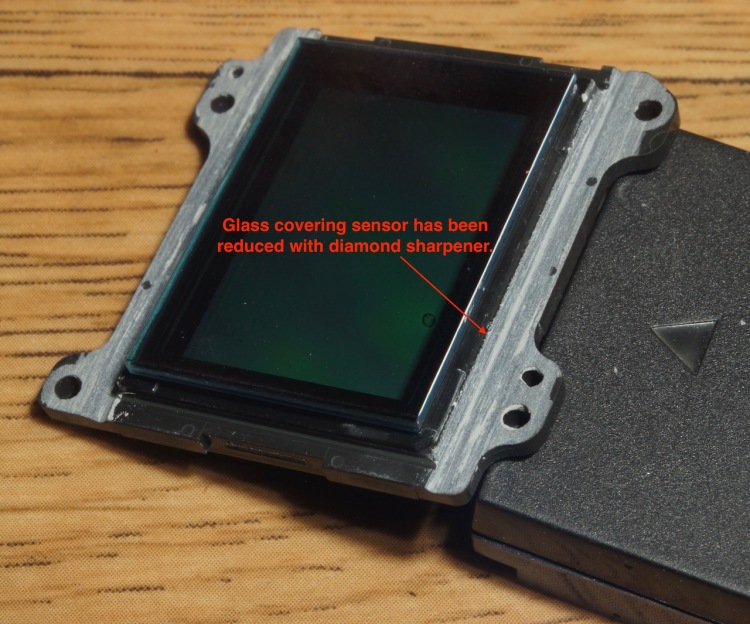
Below the Infra Red & AA Filter combo is a raised frame that sits on the glass
covering the sensor. In this photo the protection glass has been sanded
back to be almost inline with the raised filter frame.
At this point you may like to remove the filters prior to sanding down the rebate of the circuit board. That way you are less likely to slip and run the filters over the sandpaper so destroying them. Once the filters are removed the small frame over the sensor will protect it from any such accident. But you will get some dust on the sensor requiring cleaning off later.
Sanding down the rebate edge of the sensor.
Use plasterboard finishing sandpaper or 80 grit belt sander paper.
Tape or glue it down to a right angle edge on a table.
Maybe using medical gloves would be a good idea.
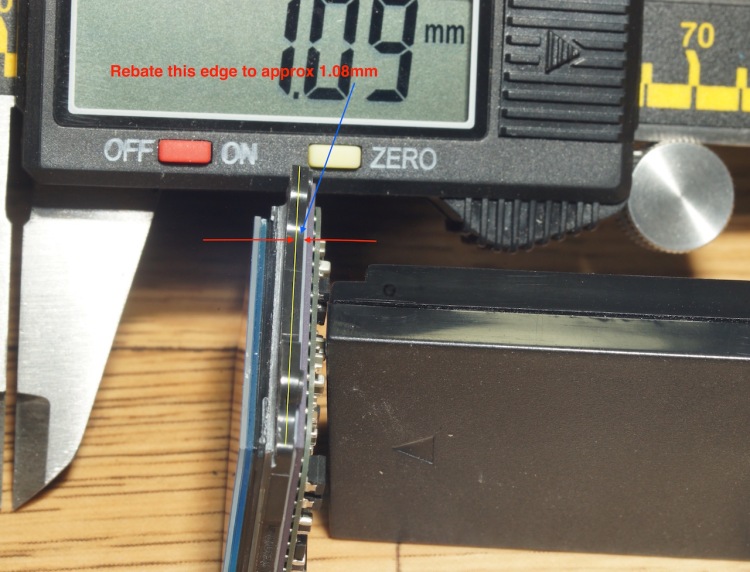
Showing the depth to which the sensor requires rebating too.
The sensor needs to be rebated to about half the thickness of the circuit board edge. I fitted my first sensor to the Nikon when at a thickness of 1.08mm. It was focussing quite well but I then blueprinted it by sanding it in situ on the film back which I wouldn’t recommend as the dust drops into the connections and stops the sensor from working till you blow it out. You may like to sand the rebate down to say 1.04mm which is probably more like where mine is now. ( I have since taken a bit more off and am getting really good focus without the Ir Filter).
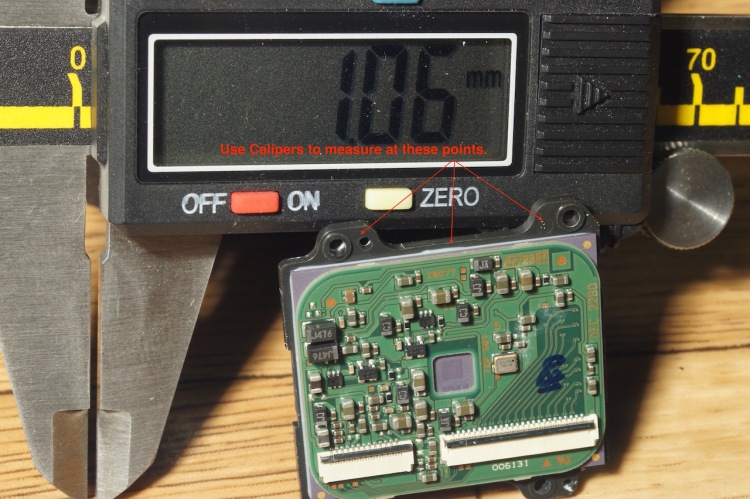
Measure the thickness at the points as shown. The raised mounting points I found
to be unequal in thickness to begin with so not a reliable point to measure.
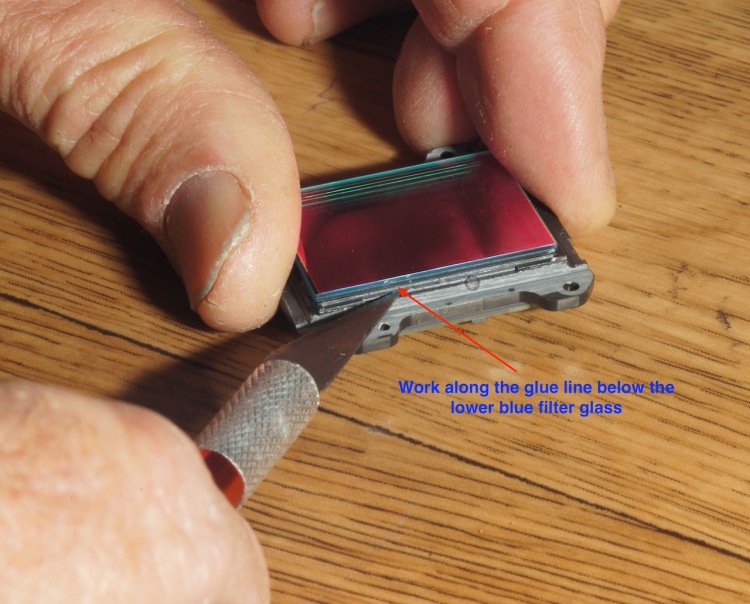
Removing the Filter Combination
The best tool is a craftwork scalpel knife as they are thin and sharp. Start by scraping a line around the glue line below the lower blue IR glass. Then start gently pressing in the knife point into the glue and move it say 1mm and repeat till you have done the perimeter. Keep doing this combining with some scraping along the line gradually pushing the knife deeper. Eventually you will be able to start pulling the knife blade along and through the glue line particularly down 3 sides. Then the filter will start to lift and you can just ease it up. Try not to push the sticky glue over the filter glass as it is hard to clean off. You should have released the filter within 15 minutes so just take your time.
Easing the scalpel along the glue line.
Pushing the point of the scalpel into the glue line.
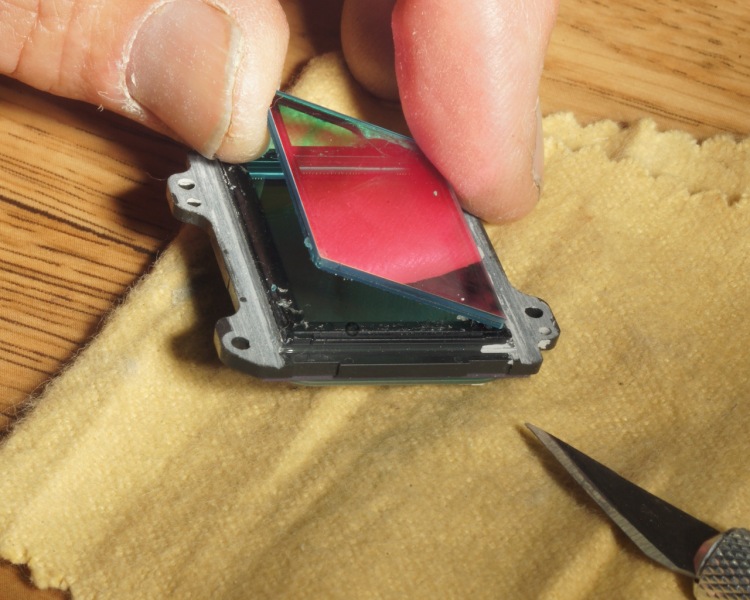
Easing the filters up off the plastic raised frame. The plastic frame on the sensor covering glass comes off the same way. You SHOULD remove this as well as it will ensure there is plenty of clearance to the shutter curtains or blades.
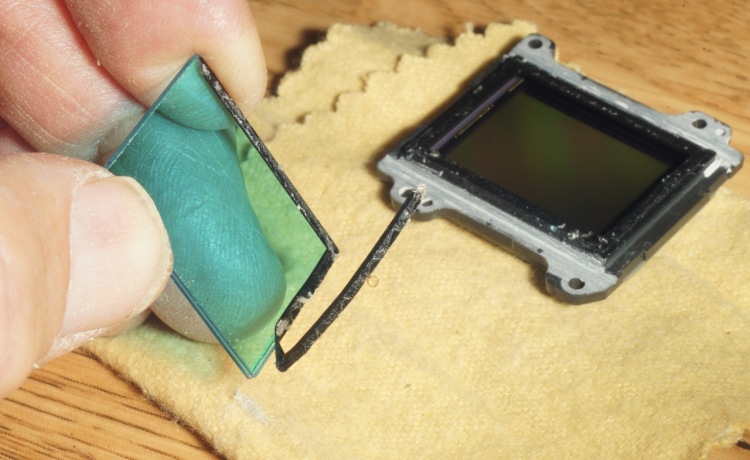
Removing the double sided tape from the filter.
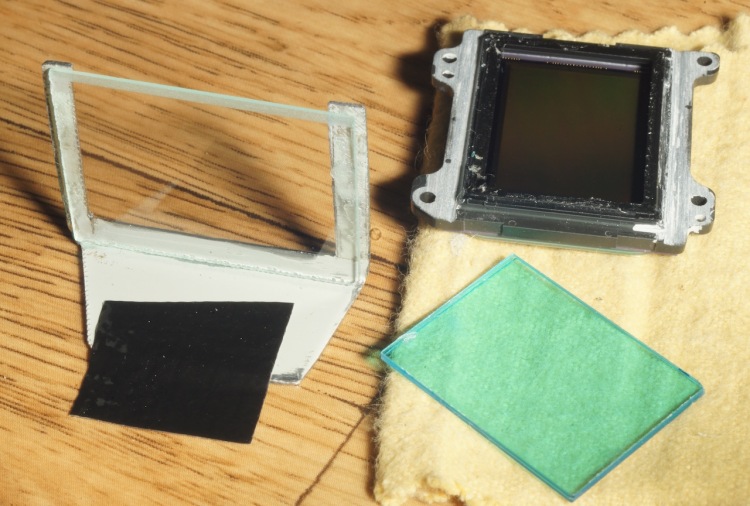
The bare sensor, Infra Red filter & AA lens combo and a clear lens frame
for inserting behind the SLR mirror when using the bare sensor for
Infra Red photography. Note – The clear glass filter is Not required but it does give some dust protection to the sensor.
When cleaning the glue off the filter for every wipe use a new bit of lens paper and lens cleaner and wipe away to the edge. Never wipe again with the same bit as this smears sticky glue all over the filter and is hard to clean off. If you think you can line up the filter perfectly with the sensor position you might be better off leaving the double sided tape in position. It’s really hard to clean it off the filter and the filter is soft on this side and easily scratched. I pretty much stuffed up the first one I attempted as it looks really scratched under a telescope lens I use to check glass.
The raised black frame on the sensor should be removed as well. It removes easily by using the craft knife to carefully slice under it. I have had an issue with this on a Nikon FA so strongly advise that the black frame should be removed so the shutters don’t strike it when shutting on a shot.
I trust this page has been useful for you and that you will enjoy the conversion of your old SLR camera to “Electric Film” as much as I have.
My Nikon FE using Electric Film to shoot all the above photos.

Can I have more info on installation and pricing for Nikon and Canon SRL cameras?
LikeLike
I will be posting another page soon on how to install the Sony Nex onto the SLR camera back. As for old SLR prices, the best source is EBay. The EBay sites in Japan have good quality cameras at reasonable prices. But often local eBay sellers have full SLR kits for bargain prices. Which ones? Try google “best 35mm SLR cameras to collect” and lots of good sites come up with info on collectable cameras. Nikon FE & FE2 are great cameras but the Nikkor AI lenses are a bit expensive at times. Canon A1 or AE1 are cheaper than the Nikons and the FD lenses are cheaper and easier to obtain. But there are lots of awesome old cameras to choose from. If your going to do the digital back conversion then try to buy an extra one for parts so the good one has a spare film back. R.G.
LikeLike
Sounds like a great project, however I question the economic viability.
Consider that even a cheap 35mm will cost $50 (and a nicely featured one like a Nikon F4 will cost $150) and you are recommending 2 cameras. That’s $100-300 to begin with. Now add a Sony Nex @ $100 for a 14 meg Nex-5, $250 for a 16 meg Nex-6 or $400 for a 24 meg Nex-7. So let’s say you use a single Nikon FE @ $100 and $250 for the Nex-6. You’ve got $350 invested plus the time required to convert. And that is a manual focus camera.
Or, for $418, you can go right out and buy a 16 meg Nikon D7000. Or for $257, a 16 meg D5100. Or for $339, a 12 meg semi-pro D300. And, of course, all of these cameras are auto focus.
I think I’d rather spend the time making the pictures than making the camera.
LikeLiked by 1 person
Hi Buddy, that is a fair and sensible comment and good advice for others. For me it has been more about the challenge than the economics. However my Canon A1 and Nikon FE kits of lenses, motor drives, Metz flashes, filters, etc in today’s money would be over $5,000 each. A Leicaflex kit from the ’70’s would be over $10,000 today. These cameras are just superb to use and a shame not to be still used.
The project would make more sense to these existing owners of high end collector kits with multiple lenses. There is no need to buy an extra camera just for the spare back. A custom back door is not hard to make as described on another page.
Thanks for your interest and feedback. Regards R.G.
LikeLike
Very nice work and great indeed if you already already have fancy film camera(s).
Just… maybe you shouldn’t count the motor drives 🙂
LikeLike
I have a canon AE1 with a couple lenses gathering dust I am looking forward to see your next article on how to mount the NEX body to the back
Congratulation for your great project…
Please let me know when you publish your next article
Yves Arbour
LikeLike
Thanks for the nice comment Yves. On the top menu is “Digital Back to Film Camera” this shows how I mounted the Nex. Your AE1 should be perfect for the conversion. I would imagine they are the same as my Canon A1 and I can see that a filter holder will fit behind the mirror on it the same way it does on the Nikon FE. You don’t have to worry about the filter holder if you just want to shoot in infrared and convert to beautiful black & whites. See my article on infrared at http://xovercameras.blogspot.com.au Looking forward to hearing from you again if you undertake the project. Tip – A Sony Nex 3 is easier to mount than a Nex 5 due to the shutter button placement.
LikeLike
Thanks for all great info
LikeLike
Thinning the sensor frame would be easier using a small milling machine. A Taig or Sherline should do. A 3D printed holding and clamping fixture to use with the mill would make it easy to modify a lot of them in quick order.
LikeLike
Excellent job Robin! I’m impressed!! I think that it easier if you put an infrared filter on the lens,isn’t it?
LikeLiked by 1 person
Thanks Greg, Yes that is an option with the IR Filter as there would be many cameras where you just cannot get the IR Filter up behind the mirror. Robin
LikeLike
Pretty cool project. Looks like you had fun creating this franken-camera.
LikeLiked by 1 person
It was awesome fun that certainly kept me awake at nights resolving the issues. Thanks for the comment. Robin.
LikeLike
can use on nikon F3?
LikeLike
If you just set it up as multispectral without the IR filter then this will work on any 35mm camera. To fit the IR Filter up behind the mirror inside your camera can be tricky. I am not sure how the F3 mirror works to be able to comment. It is a matter of lifting the mirror (on Bulb) and examining if you think you can mount the IR Filter in there without causing mirror lockup or shutter damage. Robin.
LikeLike
I had a look inside a Nikon F3 recently and see no reason why this modification would not work. Even if the IR Filter cannot go inside the camera you can always put one on the end of your lens. The digital back I made for my FE now fits my Nikon FA and Nikon FE2 (without using the IR Filter). Robin.
LikeLike
we need some good engineer-photographer who can start project on kickstarter and build some prototype.. you need only sensor, “brains”, in film roll installed batteries and some small Bluetooth button on top of the film camera shutter button. and that all. second life to all 35mm film cameras !
LikeLiked by 1 person
Well done. Now if it all fitted inside the camera it would be completely awesome.
I remember the failed eFilm project that had a similar concept but was a full insert into the film compartment.
I think there are enough ofilm enthusiasts who would love this it the film camera could be converted by a drop in cassette.
I dont care if it cost $£500-800 as long as it worked!
LikeLiked by 1 person
Well done. I’ll have to break out my venerable FE ( plus a stack of lenses ) gathering dust and look at doing this. I often wondered if someone had the guts to do this or whether anyone had made a commercial digital back for older 35mm SLR’s.
LikeLiked by 1 person
Thanks. You should give it a go. The FE’s are awesome cameras, I’ve got 3. I have since reduced the glass over the sensor to less than the film rail width and have been able to use the digital back on my Nikon FA and FE2 as well. But I cannot fit the IR Filter inside them like I can with the FE. This is not a concern as I prefer to use the digital back for infrared photography anyway. If you need any help with the project let me know. The Sony to use is either the standard Sony Nex 3 or the newer 3N. You will see how the battery on the 3 sits fairly flat enabling the Nex to be used in complete form and mounted reasonably flat across the Nikon back. The 3N looks like it would work better as that little handle on the right has no electronics behind it so when cut off that Nex will sit perfectly flat across the Nikon back. Robin.
LikeLike
I have a Contax AX which uses a moving focal plane autofocus system. i don’t think this system will work on that but it will work n my Contax RX. Someone should produce a digital camera backplate??
LikeLike
I always wanted this to become a reality.
http://www.siliconfilm.com
Perhaps someone will bring it back to life again.
LikeLike
I am wondering if this same procedure would work with other sensors besides the Sony…could I use a full frame sensor from something like a d700 or any other camera. Or what about a sensor from a d3400 with a dx sensor? is the Sony NEX of a particular configuration such that it will work where others just won’t fit?
LikeLike
The Nex sensor connects to the motherboard with ribbon cables that are just long enough to allow the sensor to be moved in front of the Nex shutter and so fit into the SLR film plane. Other digital camera sensors are hard connected to their motherboards so flipping them to the outside of their shutter is not possible.
LikeLike
Hi – excellent work – very interesting indeed. Has anyone tried this with one of the full frame Sony sensors?
Cheers
Marc
LikeLike
Thanks Marc. A full frame Sony sensor would only fit if the SLR was machined to accomodate it. The APS-C sized sensor just fits into a 35mm opening as. The sensor is surrounded by all the wires that come off it on all 4 sides. Their is plenty of width to play with but no height in the SLR film box. Regards Robin.
LikeLike
Presumably the shutter has to be locked open? otherwise you have to press the digital button at the same yime as the 35mm shutter…?
LikeLike
The Sony Nex is set at say 3 seconds. I click that first then take the picture with the Nikon which is doing all the work of metering of speed and f stop. The Nex is just acting like the film.
LikeLike